Home

A merry heart does good, like medicine, But a broken spirit dries the bones. - Proverbs 17:22
Showing posts with label D.I.Y.. Show all posts

Wednesday, October 5, 2011

Pouf, where'd the magic go?

french pouf alternate view

Remember when Fox station began airing Magic Secrets Revealed some years back, unveiling all the 'secrets' about magic?  I kind of feel that way when presenting this post, exposing the magic.

I became enamored with the above poufs exploding everywhere, or it just seemed that way to me because I desperately wanted one, but I wasn't willing to cough over a chunk of my laborous funds (it takes considerable effort to live the routine life) especially when I knew it could easily be duplicated for a fraction of the cost.

And while I kind of had an idea about how to achieve the design, putting together pieces of clothing isn't/wasn't really my forte. I love clothing design, it's design related but it still intimidates me.
I just can't imagine tearing sweet little swatches of tulle and butchering it's delicate perfection. 

If you're ready to give it a try, check out this DIY utilizing an old t-shirt.
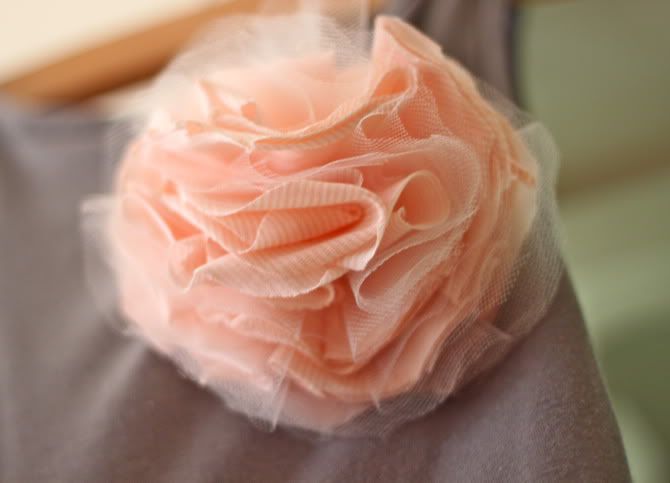
Source: Prudent Baby
If you're not really up for the challenge, or if shredding tulle intimidates you, or you just want to soak in some eye candy, you can always head over to the Ban.do site, where I originally became enamored with the pouf among other delectable goodies.

Tuesday, October 4, 2011

DIY: Lightplate Facelift


The other day, while skimming through my Target store, I came across some DuckTape sheets. I had already come across their printed DuckTape but I knew I was limited to what I could do with a tape 1.88" wide. I wanted cohesion.

It must have been my recent post on light switches that prompted me to give my lightswitch a makeover.

Afterall, if I was linking my positive thoughts to a lightswitch, I might as well make it look pretty and alluring, something that made me think something along the lines of turn those lights on! ergo, think positive.

Tools + Materials:

+ DuckTape sheets
+ box cutter
+ ruler or measuring tape (or a good ol' dependable eye)

Before + After:


I used the dependable eye and my dependable eye caused me to cut a bit too much on the switch portion. I tried looking for a switchplate lying around. If you have more time on your hands, you could detach the plate off the wall and trace your way around, box cutter in hand. It was a bit too technical for my taste at that present moment.


It didn't have as much POP as I'd wanted it to have so I might need to tie it in with some zebra or exotic animal prints. Say hello to Casper. Now say goodbye.

Have a wonderful Tuesday.


Thursday, September 29, 2011

More Block Printing + Videos


About five years ago I first came across D*S and I fell ever so in love with the mixed array of eclectic interiors which fit the bill perfectly, very much in tune with my Domino Mag.

I also owe credit to D*S for the introduction into block printing.

I've always had a kind of DIY sense to me. It's kind of ingrained into my genes to make things out of nothing. It wasn't uncommon in our home to gather some buckets, lay a piece of plywood on top, throw some colorful fabric over it and declare it a table.

But when it came to block printing, I had this archaic idea of carving my design into a block of wood. I even went as far as to purchase a Dremel rotary tool in hopes of simplifying the process, never knowing there was a simpler technique in existence. Hence, it takes a village to educate this lady who formerly lived in a bubble.

Design Sponge posts have been scattered with an assortment of painted cards, rugs and curtains all made from the block printing technique.

I just bought myself the Speedball Deluxe Block Printing Kit and I intend to tackle some nautical inspired curtains and zodiac plastered aprons. I'd love to give some away to family this coming Christmas, if I can master the technique.

Source: bhg.com via Kimberly on Pinterest


The video above is a bit lengthy and the additional techniques seem unnecessary but I included it in hopes that it might inspire you to get out and start making some prints using block printing. Because personally, I just can't get enough, a la Depeche Mode style.

Monday, September 26, 2011

B+A: A DIY solution to an existing 'After' project

A few months ago I created my kitchen island using butchers block and an old mechanic's table. It didn't exactly fit the criteria of a kitchen island for me because it lacked a lot of the ammenities that most kitchen islands have such as storage space, an extra sink or, at least, a fancy bottle opener.
Bottle Opener, Stainless Steel - Seachoice
But I made it. I love it and I was determined to make it better.


Progress...

I already had two baskets I was already using to store my potatoes, onions and garlic.  Having them sit in the pantry deflected the visual appeal they served in motivating me to prepare something scrumptious with more frequency. Translation: I needed those basket within view.
Supplies:

01. baskets
02. wire
03. wire cutters


The mechanic's table actually had holes on the underside of the table which served as a grasping points to tie the wire around and support the baskets.


And here is a photo, complete with the original mechanics table sticker of 200 lb. capactity. 

Of course you might not have a mechanic's table for a kitchen island (or do you?) but you should know that the possibilties with a little imagination and wire (and yarn, string, rope, paint, etc etc. etc.) are limitless.

Friday, April 29, 2011

DIY + Restaurant Kit (For Kids)


Everything is a little funner when it's got some allure to it. 

Think Target vs. Walmart debate. Do I prefer pretty pink/pastel overhead decor or navy-blue-with-yellow-color-combo-and-smiley-face. I can see where Walmart thought smiley faces might conjure up festive shopping but....pretty beats smiley anyday, at least in my book. A true win-win: pretty and smiley.


For this DIY, the clear plastic pouch (girls version) I picked up from my local thrift store, circa 1997, seemed to work best as it holds the paper design securely.

Upon searching through my beloved Amazon site, I came across nothing recognizable. There were, however, some pretty looking pouches ready-to-go leaving you with only the goods stuffing, which I bet you're pretty awesome at.

Tools + Materials:

+pencil pouch (clear plastic works best for above design)
+boy or girl template (to achieve the above design)
+crayons
+scraps of paper: plain, lined, graph, construction

Optional:
+mini coloring pages (or take inspiration from this)
+mad libs
+mini chalkboard
+kid-safe scissors
+Bendaroos or pipe cleaners ( a much cheaper alternative)
+play-doh

Directions:
01. Stuff away
02. Stuff in purse
03. Never leave home without it
04. Enjoy watching the little ones get creative

Have a wonderful weekend and thank you for sharing this week with me.

Love your babies, kiss your hubby, tell your mom (and dad) how much you love her (and him) and mail that card, even if it's "too late".

Is it just me or are you also absolutely loving Super Targets everywhere?

Tuesday, April 19, 2011

Something for the Little Poopers (aka Pup, Pooch, Perrito)


Before

After
This is the first time ever that the kids have  attempted to help out with chores pertaining to puppy.

It's been adorable to watch my seven-year old  make squishy, semi-gagging faces while picking up pup's poops, and equally adorable to watch as my five-year old almost embraces the icky smells. Gross, but adorable.

They'd taken up the task of feeding pup but somehow leaving it up to their little hands to cup handfuls of dogfood straight from the bag from garage to kitchen proved to be a little disastrous. Which is why I needed to undertake something to simplify the process, and make it look alluring enough to sit in my kitchen.

Behold, something for the little pooper:


He's golden. He's teal. No, he's a dogfood container. 

Here's the DIY:

Tools/Materials:
+tin can
+spray paint (2 colors)
+template
+glue
+paintbrush
+x-acto blade
+polyurethane

01. Head on over to your local thrift store, garage sale, yard sale and pick up one of these oversized, Christmas leftover popcorn containers. They're everywhere.

02. Get your puppy silhouette template here or create your own.

03. Cut the template out with an x-acto knife.


04. Spray paint the template to your desired color. I used metallic spray paint. You'll need this for the trim as well.

05. Spray paint your tin. I used Krylon Blue Ocean Breeze (left over from my Booklift project).


06. Since the tin is round, I didn't want to butcher it with a stencil so I decoupaged the thing. Notice the  Elmer's glue up top and paintbrush ( I learned to decouage from Ms. Martha here).

07. Decoupage: (a) brush a coat of glue on desired spot on tin (b) place design over glue spot on tin (c) roll it out to eliminate bubbles/wrinkles (sorry, facial wrinkles exempt) (d) brush a coat of glue over design, repeat five min. later  (e) brush a coat of polyurethane once design is completely dry.

08. Spray paint the trim with Metallic paint, or other color.

09. Get yourself a scoop like this one and fill with goodies.

The nice thing about this project is that's its versatile enough to be used as toy storage for blocks and legos and yes, it can be used for kitty too.

Friday, April 15, 2011

Freebie Friday + Feeling Nautical


I usually provide freebies to decorate the home but today I'm dressing up my stationary, or otherwise plain white envelopes.

Who sends traditional mail anymore?  I do. My boys are always making little cards and dinosaur pictures or learning how to spell new words and I find these the perfect little articles to send to grandma as evidence of these milestones, and keepsakes.

If you don't have children, send a group of true friends special photos not plastered all over Facebook. Or a poem you've written.

I like putting forth some effort into making it a signature piece that at first glance your distant mail buddy (mom, dad, sibling, friend, cousin, lover) will know this message came from you.

Just knowing a package was handled by a loved one makes  it all the more special.


Materials:
+template
+envelope (fits a legal or letter; cut to fit, if necessary)
+scissors
+glue
+optional: print additional copies to decorate the face of the envelope

01. Cut out desired template.
02. Fit to size. Don't cover adhesive.
03. Glue template down to interior.
04. If desired, use scraps to decorate the face of the envelope or letter.

Happy Mailing Friday!

This post was not sponsored by the USPS. ;)

..............................................................................................................................................................
 ::Terms & Conditions::


I believe sharing is caring. I believe design should be fun, friendly (comedic if the occasion calls for it) and affordable. I believe everyone has an equal right to make their house their home & haven. That being said, please feel free to share but always do so giving due credit to LaTendedera and a link back to this original post. And please, do not duplicate material for sale. All rights reserved. I thank you in advance. I'm glad we're friends.

Monday, April 11, 2011

Before & After : Booklift


Most people create pro and con lists for their place of employment with ideas that foster around salary and commute time. While my list does entail that, higher up on the pros and cons are where this position serves me in my creative endeavors and serves me in my role as mom.

Working for a school has its perks. If I must work, I have weekends off and my work schedule mimmicks the childrens' school hours almost exact. This is a plus for my role as mom.

But where does this present position serve me in my creative pursuits?  Outside of my office door (the ol' Principal's office) we have a freebie table. On this table you'll find all the old scraps people no longer have a use for such as frames and cups and fabric and tacky looking book lifts that don't match their home decor any longer.

But that's where this DIY chica comes into play and snatches every little homeless article I can re-love. I'm a total traditionalist so I haven't exactly done away with my handheld books in lieu for some Kindle. As for the other perks, there is a typewriter on site, and very pretty vintage children's books (circa 1950) to peruse through on my break.

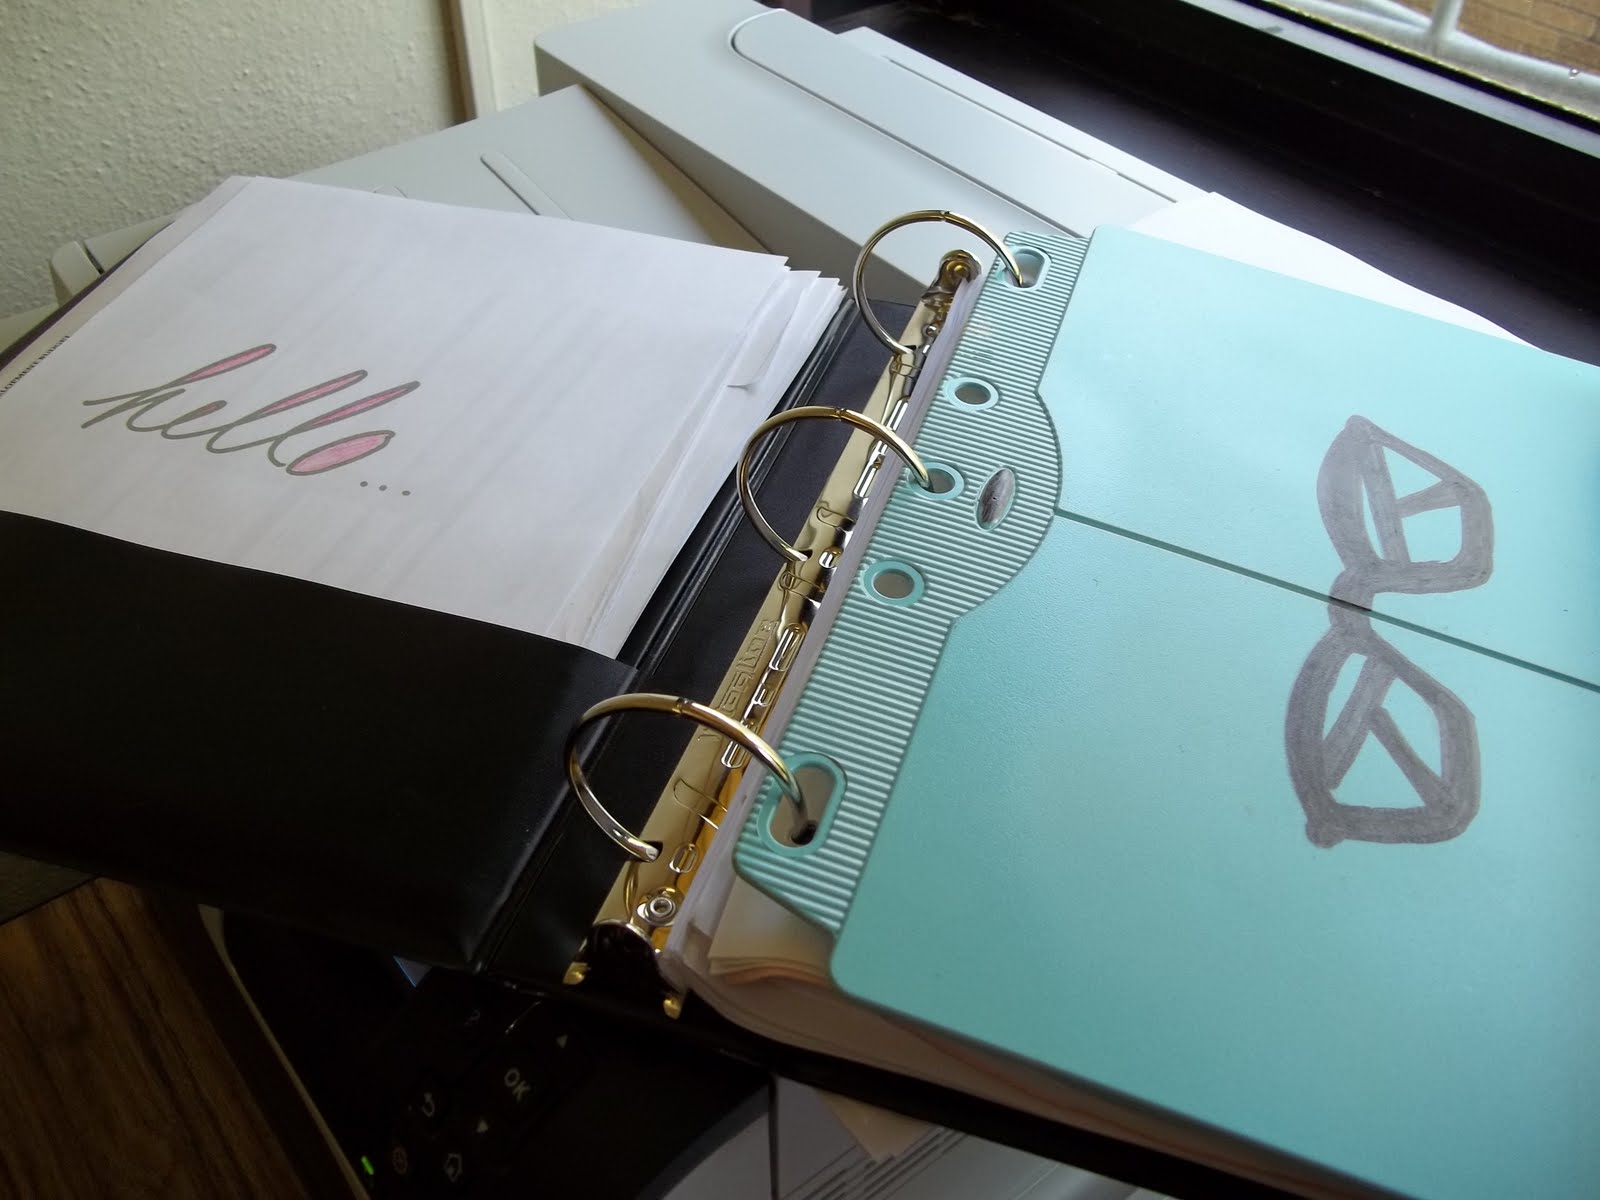
The following is not a full DIY but the details for achieving the above design. The eyeglass design was inspired by this design and these pillows I saw on Design Sponge.

DIY details
+ Fellowes book lift
+spray paint (I chose Krylon Blue Ocean Breeze)
+Handraw your design


Tuesday, April 5, 2011

DIY + Nail Board (For Kids)


Most of my fondest memories I owe to my kindergarten years. Art was at the core of every subject and once 'lecture' came, we had the daunting task of doodling letter formation into trays lined with salt. Every so often I would lick specks of salt from my fingertips and get eyed from the teacher. But that's about as rebellious as we kids got and, for the most part, we were all relatively innocent.

As the idea surrounding reunions comes to mind, I can't help but wonder why we never planned a reunion centered around our innocent selves. A time when we could only dream of what it would be like to hold hands with that boy you had a crush on for the entire five elementary school years ( I did, Mark Aguilar was his name and I vividally remember his oversized ears as sheer perfection). Or reuniting with school girl BFF's you actually did use to hold hands with.

The above project was a favorite of mine. I don't even know the name of it and in reseaching the Lakeshore site, I didn't come across one either. It was a board with nails on it and you manipulated rubber bands to form shapes. My youngest boy is in his kindergarten years and given my years of living, I often forget what a charming little age he is living in and how fondly he appreciates treasures mom makes.

Materials:
+small piece of plywood
+nails (one with a soft round tip)
+hammer
+rubber bands
+ruler

01. Use a ruler to measure where you will place your nails. Place a dot there.
02. Hammer in your nails (use nails with soft rounded tips as sharp tips can be dangerous)
03. Rubber band your way to happiness.

Thursday, March 31, 2011

DIY + my nut case job


Materials:
+recycled jar(s) [ via spaghetti, jam, pickles, etc. ]
+black acrylic paint (or other dark color)
+painters tape
+some nutty concoction to showcase in your jar

01. Tape it up


02. Paint it up.


03. Shake it up (or don't ).
04. Chalk up a storm.

Wednesday, March 30, 2011

D.I.Y. [ featuring puppy love ]


I've been itching for a new project to undertake but presently I'm limited to the confinement of a work desk and computer.

Materials:
+download template here (makes 2)
+glue (or tape)
+scissors
+straw
+ [optional] coffee (milk, nescafe and sugar to taste, add ice cubes and enjoyment to the mix. Blend it up  or enjoy it a la rocks)
+ music (may I suggest some Miles Davis )

Glue sides of two circles together to create a snug fit over straw. Next, allow your straw to "slip into something more comfortable". Enjoy.
..............................................................................................................................................................
 ::Terms & Conditions::


I believe sharing is caring. I believe design should be fun, friendly ( comedic if the occasion calls for it) and affordable. I believe everyone has an equal right to make their house their home & haven. That being said, please feel free to share but always do so giving due credit to LaTendedera and a link back to this original post. And please, do not duplicate material for sale. All rights reserved. I thank you in advance. I'm glad we're friends.

Tuesday, March 8, 2011

DIY + Chalkboard Block


Considering that I'm on day five of being home with the boys, I've got kids on the brain. And ever since I came across the Made by Joel  site,  I've been enamored with all the inticate ways we can recycle our goods to bring joy into our childrens' lives, and/or ourselves.

Whenever I visit my husband on his construction project sites, I shop around for little blocks of wood or things I view as recyclable and reloveable. There are times certain items sit around on my shelves until I find a good use for it or it gets tossed into the fire pit as I mentioned here.

 I'm always looking for creative ways to get my children to study their sight/dolce/frequently used words or fun ways to practice their writing skills. Or a neater way to keep them entertained (aka:quiet) in the car...

For this project:
+block of wood
+Black acrylic paint(or other dark paint) or thick black Marks A Lot permanent marker or chalkboard paint
+chalk

This one is self-explanatory. Paint the surface with your paint or marker. Start doodling with your chalk.
Tic Tac Toe

Practicing sight words

And for the readers out there without the little ones, use it as your mini to-do block/list for the day...

Friday, March 4, 2011

Robert Sabuda + Matthew Reinhart [pop-ups!]

In keeping with yesterday's tradition of paper crafts, check out these true pop-up books.


I found this pop-up by Robert Sabuda and Matthew Reinhart in Artist-to-Artist: 23 Major Illustrators Talk To Children About Their Art. Both have authored such books as Encyclopedia Mythologica: Fairies and Magical Creatures Pop-Up, Encyclopedia Prehistorica: The Complete Collection and No Biting, Louise, among others.

What caught my eye most was the Encyclopedia Prehistorica: The Complete Collection which would be an eyeful for my dino-loving boy.

Totally inspired by the pop-up. I set out to buy an xacto knife  and blade pack in hopes of creating something of caliber...that wasn't so much the case.


Out shopping this morning,  I spotted this product by Creativity for Kids which inspired me to take baby steps in my attempt to become a pop-up artist (in my kids' eyes).

Tools:
+one 8x10 sheet of paper (or your choice size and color)
+ scissors
+willpower (just kidding)

 01. I started off with a very basic 8X10

02. Fold it in half

03. Snip a portion off the top to shape the interior portion into a heart.
04. Make the heart crease to both sides. 
05. Get creating!

And you're done! 

Get going and get crafting to surprise your little dudes! Happy Friday!
Related Posts Plugin for WordPress, Blogger...